Cook Corn in the Husk: Your Shortcut to Juicy, Mess-Free Perfection
Imagine sinking your teeth into a perfectly cooked ear of sweet corn – bursting with flavor, incredibly juicy, and with not a single silk strand in sight. Now, imagine achieving this without heating up your kitchen with a boiling pot, firing up the grill, or enduring a messy shucking process. Sounds like a summer dream, right? Well, it's not a dream; it's the magic of learning how to
microwave corn on the cob *in the husk*. This revolutionary method isn't just fast; it's a game-changer for anyone who loves fresh corn but dreads the fuss. Get ready to discover the easiest, cleanest, and most delicious way to enjoy this summer staple all year round.
Why Microwave Corn in the Husk? The Ultimate No-Mess Method
When it comes to preparing fresh corn, traditional methods often involve a trade-off between flavor and convenience. Boiling can dilute the sweetness, grilling requires constant attention, and oven roasting heats the entire house. Microwaving corn on the cob, especially within its natural wrapper, solves these dilemmas and introduces a host of benefits that make it the superior choice for many home cooks.
Effortless Preparation and Cleanup
Perhaps the most appealing aspect of this method is the absolute minimal prep work and cleanup. There’s no need for tedious shucking before cooking. The corn cooks directly in its husk, which acts as a natural steaming pouch. This means no sticky silks to pull off, no corn kernels flying around, and no large pots to scrub afterward. Just place the corn in the microwave, cook, and enjoy. This makes it an ideal solution for busy weeknights or when you simply want a quick, healthy side dish. If you're looking for more quick and easy methods, check out our guide on
Microwave Corn on the Cob in Minutes: Quick & Easy Guide.
Consistently Juicy Results
The husk is not just a protective layer; it's also a fantastic natural steamer. By cooking the corn on the cob directly in its husk, you trap all the natural moisture and sweetness within. This steaming action ensures that every kernel is plump, tender, and incredibly juicy, far surpassing the potential dryness of grilled corn or the sometimes-watery texture of boiled corn. The natural sugars caramelize slightly, intensifying the corn's inherent sweetness without any added ingredients.
Perfect for Any Batch Size
Whether you're craving a single ear of corn for a quick snack or preparing a few for a family meal, the microwave method is perfectly scalable. You don't need to fill a giant pot for just one or two ears, nor do you need to fire up a grill for a small serving. It’s perfect for couples, individuals, or small gatherings, allowing you to cook exactly what you need without waste.
Beat the Heat
Summer is prime corn season, but it's also when nobody wants to add extra heat to their kitchen. Microwaving corn in the husk generates minimal ambient heat compared to boiling water or using an oven. This makes it an ideal cooking method for those sweltering summer days when you want a delicious, fresh side dish without breaking a sweat.
Mastering the Microwave Corn in the Husk Method: A Step-by-Step Guide
While the concept is simple, a few key steps ensure you get that perfect, juicy ear of corn every time. This detailed guide will walk you through the process, from selecting your corn to serving it with ease.
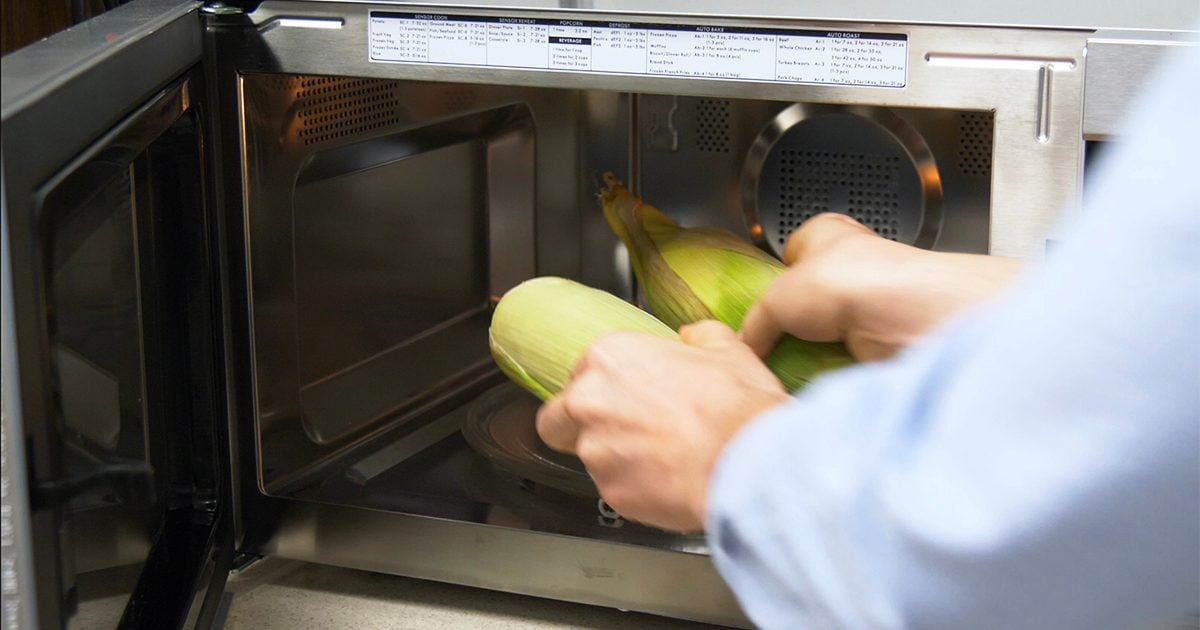
Step 1: Prepare Your Corn
Start with fresh, vibrant ears of corn. The greener the husk and the plumper the kernels (felt through the husk), the fresher and sweeter your corn will likely be. You don't need to peel or shuck the corn at this stage. Instead, simply trim off the very end of the stalk – about an inch or so – to remove the woody, non-edible part. You can also pull back any excessively loose outer husks, but ensure the corn is still fully wrapped by at least a few layers of husk. The goal is to keep the kernels fully covered; this is crucial for the steaming process.
Step 2: Microwave to Perfection
Place your prepared corn directly into the microwave. There's no need for special dishes, water, or even a paper towel if you're cooking it in the husk. Arrange the ears in a way that allows them to cook evenly, typically without overlapping too much.
The cooking time is incredibly straightforward:
*
1 ear = 4 minutes
*
2 ears = 8 minutes
*
3 ears = 12 minutes
*
4 ears = 16 minutes
This rule of thumb (4 minutes per ear) is a reliable starting point for most microwaves. If you're cooking more than four ears, it's generally best to cook them in batches to ensure even cooking and optimal results. Placing too many ears in the microwave at once can lead to inconsistent cooking, with some ears undercooked and others perfectly steamed.
Step 3: The "No-Mess" Husk Removal
This is where the magic truly happens, transforming a messy chore into a satisfying "pop." Once the microwave beeps, carefully remove the hot corn. It will be very hot, so use tongs or oven mitts. Let the corn rest for 2-3 minutes; this allows the internal steam to dissipate slightly and makes handling easier.
Once it's cool enough to touch, place the ear on a cutting board. With a sharp chef's knife, carefully slice off the bottom end of the ear – the part where you trimmed the stalk – cutting through a few rows of kernels. Make sure you cut cleanly through the cob.
Next, grasp the top (pointed end) of the corn firmly. With your other hand, apply gentle pressure and squeeze the corn from the top. The perfectly cooked ear will effortlessly slide out from the bottom, leaving the husk and *all* the silks behind! It’s truly a marvel of convenience, leaving you with a perfectly clean, ready-to-eat ear of corn.
Step 4: Serve and Savor
Your microwave corn on the cob is now hot, juicy, and ready to enjoy! Serve immediately with your favorite toppings. Classic choices include a generous knob of butter, a sprinkle of sea salt, and freshly ground black pepper. For a gourmet touch, consider a chili-lime butter, a sprinkle of fresh herbs like cilantro or chives, or a dash of paprika. The possibilities are endless, and because the corn is so perfectly cooked, even the simplest seasonings will shine.
Optimal Cooking Times for Microwave Corn on the Cob
While the 4-minute-per-ear rule is excellent, understanding the nuances can help you achieve perfection every time. For even more detailed information on timings, check out our article:
How Long to Microwave Corn? Perfect Cook Times & Tips.
Understanding Microwave Power
Microwave wattages can vary significantly, typically ranging from 700 to 1200 watts. Most recipes assume a standard 1000-1200 watt microwave. If your microwave has a lower wattage, you might need to add an extra 30-60 seconds per ear to achieve the desired doneness. Conversely, a very high-powered microwave might cook slightly faster. The best indicator of doneness is if the corn is steaming hot when you remove it, and the kernels feel tender when gently squeezed (through the husk). If it's not quite there, pop it back in for another 30 seconds.
Batch Cooking Recommendations
As mentioned, for the best results when cooking more than four ears, it's highly recommended to cook them in batches. Overcrowding the microwave can lead to uneven cooking, where the ears in the center might be less cooked than those on the outside. By cooking in batches, you ensure that each ear receives sufficient microwave energy and steams uniformly, resulting in consistently juicy and tender corn.
Choosing the Sweetest Corn: A Pro's Guide (No Peeking Required!)
The secret to truly delicious corn starts before it even enters your kitchen. Here’s how to select the best ears without pulling back the husk and potentially damaging the corn for others:
*
Look for Green, Tightly Wrapped Husks: The husk should be bright green and tightly wrapped around the ear. Avoid corn with dry, yellowing, or loose husks, as this indicates older corn that may have lost some of its sweetness and moisture.
*
Check the Silk: The silk emerging from the top should be slightly damp, light brown, and feel a bit sticky. Avoid dry, brittle, or black silks, which are signs of older or dehydrated corn. A healthy ear of corn will have a good amount of silk.
*
Feel for Plumpness: Gently squeeze the ear of corn through the husk. It should feel firm and plump all the way down. You want to feel distinct, well-developed kernels. Avoid ears with soft spots, missing kernels, or a pointed, undeveloped tip. These are signs of incomplete growth or damage.
*
Consider the Weight: A heavier ear of corn usually indicates more moisture and plumper kernels. Lighter ears might be drier or less developed.
*
Avoid Holes: Small holes in the husk can be a sign of worms or insects, which you definitely want to avoid!
Expert Tips for the Best Microwave Corn Experience
*
Don't Rush the Rest: Allowing the corn to rest for a few minutes after microwaving is crucial. This not only makes it safer to handle but also allows the internal steaming process to complete and the heat to distribute evenly, resulting in perfectly tender kernels.
*
Season Generously: While the corn is hot, butter and seasonings will melt and adhere beautifully. Don't be shy!
*
Freezing for Later: You can enjoy the taste of summer corn all year round! After cooking and removing the husk, let the corn cool completely. Then, either wrap individual ears tightly in plastic wrap and then foil, or cut the kernels off the cob and freeze them in airtight bags. This allows you to pull out a taste of summer even in the depths of winter.
*
Experiment with Toppings: Beyond butter and salt, consider smoked paprika, garlic powder, crumbled feta or cotija cheese, a squeeze of lime, or even a drizzle of hot sauce for an extra kick.
Conclusion
The microwave corn on the cob in the husk method is a true culinary revelation. It offers unparalleled convenience, a mess-free experience, and consistently delicious, juicy results that rival or even surpass more labor-intensive cooking methods. By following these simple steps and tips, you can transform a humble ear of corn into a delectable side dish in mere minutes, freeing up your time and keeping your kitchen cool. So next time you're at the market, grab a few ears of sweet corn, head home, and prepare to be amazed by the magic of your microwave. Happy cooking!